


Search
A Diy Gallery Wall Guide:
- Danielle Grace
- Aug 26, 2023
- 6 min read

Lets talk about gallery walls ; ) they literally seem to be everywhere! And after scrolling through beautiful pics on Pinterest... you decide that's what I need in my home! But then you think... what technically is a gallery wall and can I do it myself?
Yes, you can! Let's begin with the basics, a gallery wall is also called a photo wall; it includes anything from a variety of art, photos or posters that are arranged in a specific space on your wall. It also gives you flexibility to be as creative as you want when your designing this space. I like to think of gallery walls as space fillers- meaning you can take a big chunk of wall space that you had no idea what to do with and create a beautiful piece of art or a collection of memories that are meaningful and inspirational to you.
Now that you decided on creating your fabulous gallery wall- you actually have to figure out how to do it! So, what are some of the steps involved and how do you want it to look when its all finished?! I know when I was planning my gallery wall, I could've used some simple advice and suggestions. So, I thought I would create a quick guide with some helpful tips and a little inspiration that may help in your design process.
* These are the basic steps when designing a gallery wall*
- Color Scheme
- Theme
- Layout
- Style/Template
- These step are in no specific order! You may already have the template figured out or you know the specific frames you want to use. Or perhaps you have all the photos and art picked out because you've been dreaming about doing this for years!
The following steps are just a guide and are in no particular order:
- Style/Template:
- When creating your gallery wall, you'll need to figure out what kind of style or wall template your going with. You can definitely research some ideas on google for different types of templates.
If your looking for more inspiration, you can check out these two websites that offer free template suggestions and ideas; www.printandproper.co and https://www.mywalldecorator.com

Uniformed grid.
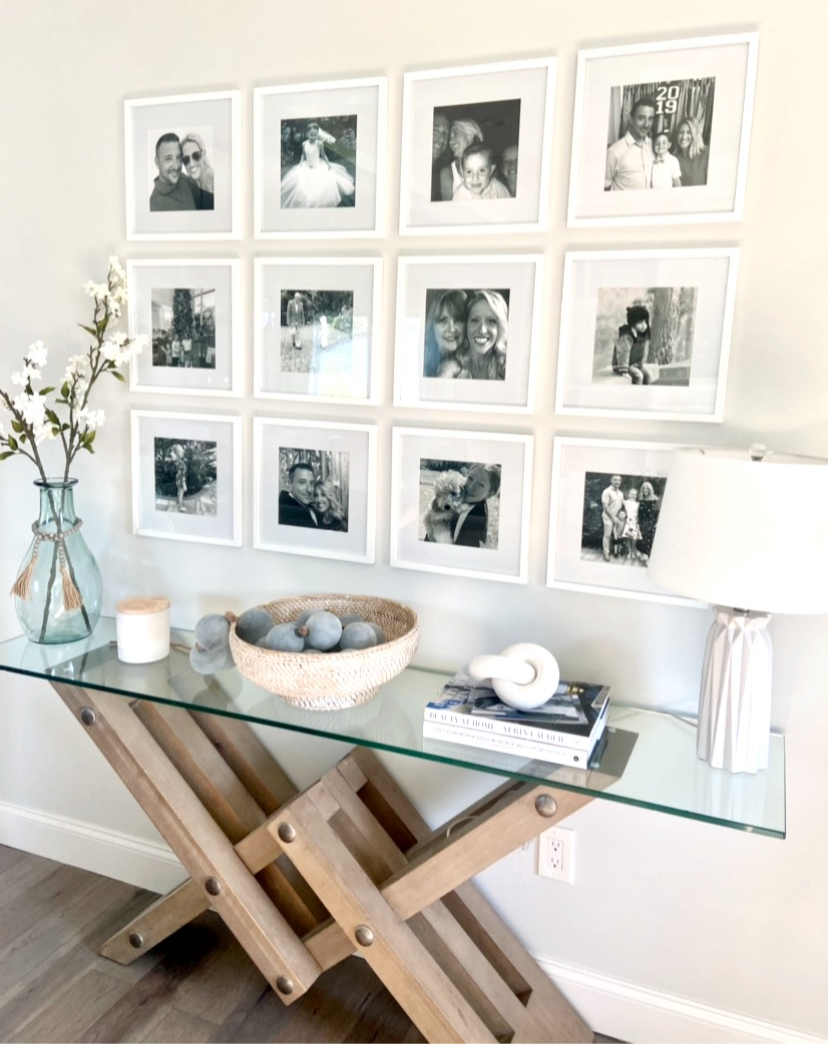
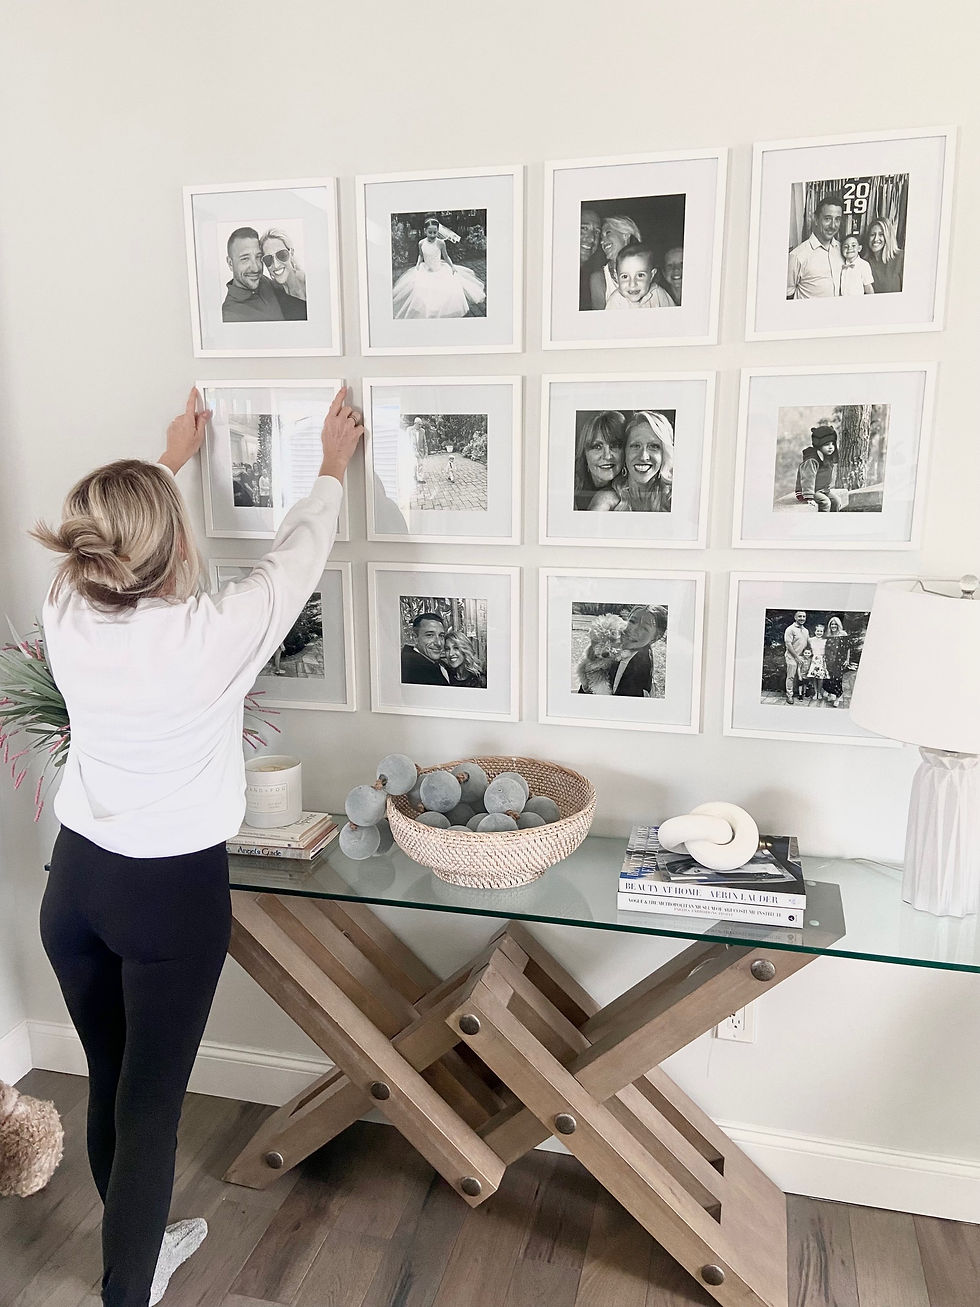
- You can opt for a uniformed grid look, which is what I went with for in my living room. It's simple because it showcases all the same size photos and frames. Its a popular option because it doesn't take much creativity and looks beautiful.
I found a set online that included 12 white wall frames, measuring 13"x13" with photos measuring 8"x8" from the Joss and Main website. I didn't have to worry about the spacing because of the existing template it came with. Though, I did measure the spacing and found it was 2 inches between each picture.
I loved this set because it came with a wall template ready to use. The trickiest part was getting the template to hang straight on the wall! But, we used a level and it helped to hang everything perfect or as near perfect as possible ; ) Having an existing template to use was very helpful when designing my gallery wall.

The frames I bought aren't available any longer- but I found a similar set from wayfair. It also comes with an existing template and ready to use photos if you haven't printed yours out yet! Or you check out Ikea, they had some great options for frames that were affordable as well! I originally wanted frames from Ikea, but they weren't in stock and I had no more patience-lol!

Grid Style:


- Another option is the the free-form look:

The free-form style gives you a little more creativity because you can choose different sizes of everything! Meaning it's not a uniformed grid look and you can mix and match different size frames with whatever photo or art you'll be displaying as well as blending in b&w, neutral or color photos all together! When going with a free form style you may want some inspiration on templates to choose from since there's multiple ways to create this look!
Since, we're not all created equal and I really need balance in my life lol- this option isn't for me, but I absolutely love this style and when it's done right- it looks stunning on the wall! Wish I could just go for it!!


Tip: The free form style is great if your looking to make one or two photos or pieces or art stand out. You can choose larger frames to showcase the pieces of art or photos as your focal points and use smaller frames filling in the rest of your wall gallery.
- Theme:
What kind of art or photos will you be displaying? Some of the design experts suggest going with a cohesive look- Meaning the pictures you choose should all have a common color palette or have a similar theme; family pictures, travel and vacation photos, wedding photos, baby and children photos, an engagement photo shoot, maybe it's the prints from designing and building your dream home, abstract art, pop art, art from the renaissance period etc... Whatever the theme is, the fact that it's cohesive just means that it will look and feel balanced and be more visually appealing to the eye.

Abstract art walls can still feel cohesive because of the character it brings to the home!

- Color Schemes:
Yes, color scheme matters because it helps set the mood of the room! Colors create feelings from calm and serene to joyful, sleek and modern. Choosing neutral palettes of white, cream and beige will create a calmer mood where as using photos with bright colors will exhibit more of a happy and cheerful mood. An all black and white color theme will definitely take on a modern feel. Take time to think how you want your room to feel- There is no right or wrong way to go!!

Tip:
If your looking for a classic look, I would recommend sticking to a similar color palette- meaning if your doing black and white photos then stick to all b&w photos and the same goes when using neutral or bright colorful photos. Sticking with a similar color-palette is simply more pleasing to the eye.

- Plan out your gallery wall: (There's really only 2 ways you can do this- the floor or the wall!)
-The Layout:
Choosing to lay everything out on the floor is great because you'll get a good idea of how its going to look on the wall. Plus, it's easier to rearrange the frames on the floor until you find your perfect design. Once you have your lay-out complete, including the spacing between each frame, it makes for an easy transition to the wall. This will hopefully help in reducing the amount of holes you make in your walls!!

Or you can actually plan it on the wall.
You might have an existing template to use as a guide which will be easier to put up. If not, then you can replicate the gallery wall by cutting pieces of paper or card stock the exact same size of the frames you'll be using and putting it up on the wall with tape. I recommend using painters tape. It's alot easier to take down because it doesn't damage the paint. Now, you'll see it arranged on the wall just the way you envisioned it!
My orange paper was purely reference for me - it was definitely not cut neatly and didn't have the exact dimensions that I needed. It was just to see if I even wanted to hang pictures up on that wall - which, I ended up not hanging anything!!
Check out www.familyhandyman.com for tips and inspiration on prepping and hanging your wall art!
Does the size of the wall matter? Yes, the size of the wall matters! The bigger the wall size means the more frames and pictures you should be displaying on your walls. First, if you have a larger wall space and you only hang up a few small frames, your gallery wall can get lost in the room, almost disappearing. Second, it will definitely not get the attention it deserves!

*Once your gallery wall is up it's easy to change the style or theme any time you want.
This is the main reason I love gallery walls. If your like me and like to change the look of things and quite often I might say... Then gallery walls are the perfect canvas for that. I will tell you why! Even though your frames are already up on the walls and say they're not going anywhere. Well for starters, because it took forever to get them up and arranged exactly the way you want or you simply don't want another new project for yourself (and I don't blame you)! You can still change the look of the room quickly because it's not set in stone.
You can easily create a whole new look or color scheme just by swapping out your old photos for new ones. Maybe you want to switch to an all black and white theme or you had scenery photos up and now want to put your wedding photos on display. Or you just came back from an amazing vacation and you want to see all the memories you captured. The fact that you can easily swap out photos for a new and updated look or a new color scheme is a great way to change the look and feel of the room with out changing the whole design!
Making things pretty xo
***Gallery wall template ideas and some inspiration ; )


Comments